
Procreate is one of the best drawing apps on the iPad. While it may have a bit of a learning curve, it's not too difficult to get started!
Procreate is one of the best drawing apps for the artist's iPad. However, if you're unfamiliar with art apps, it can be a little overwhelming at first, so here's a handy guide to get started.
What's on the Home Screen?
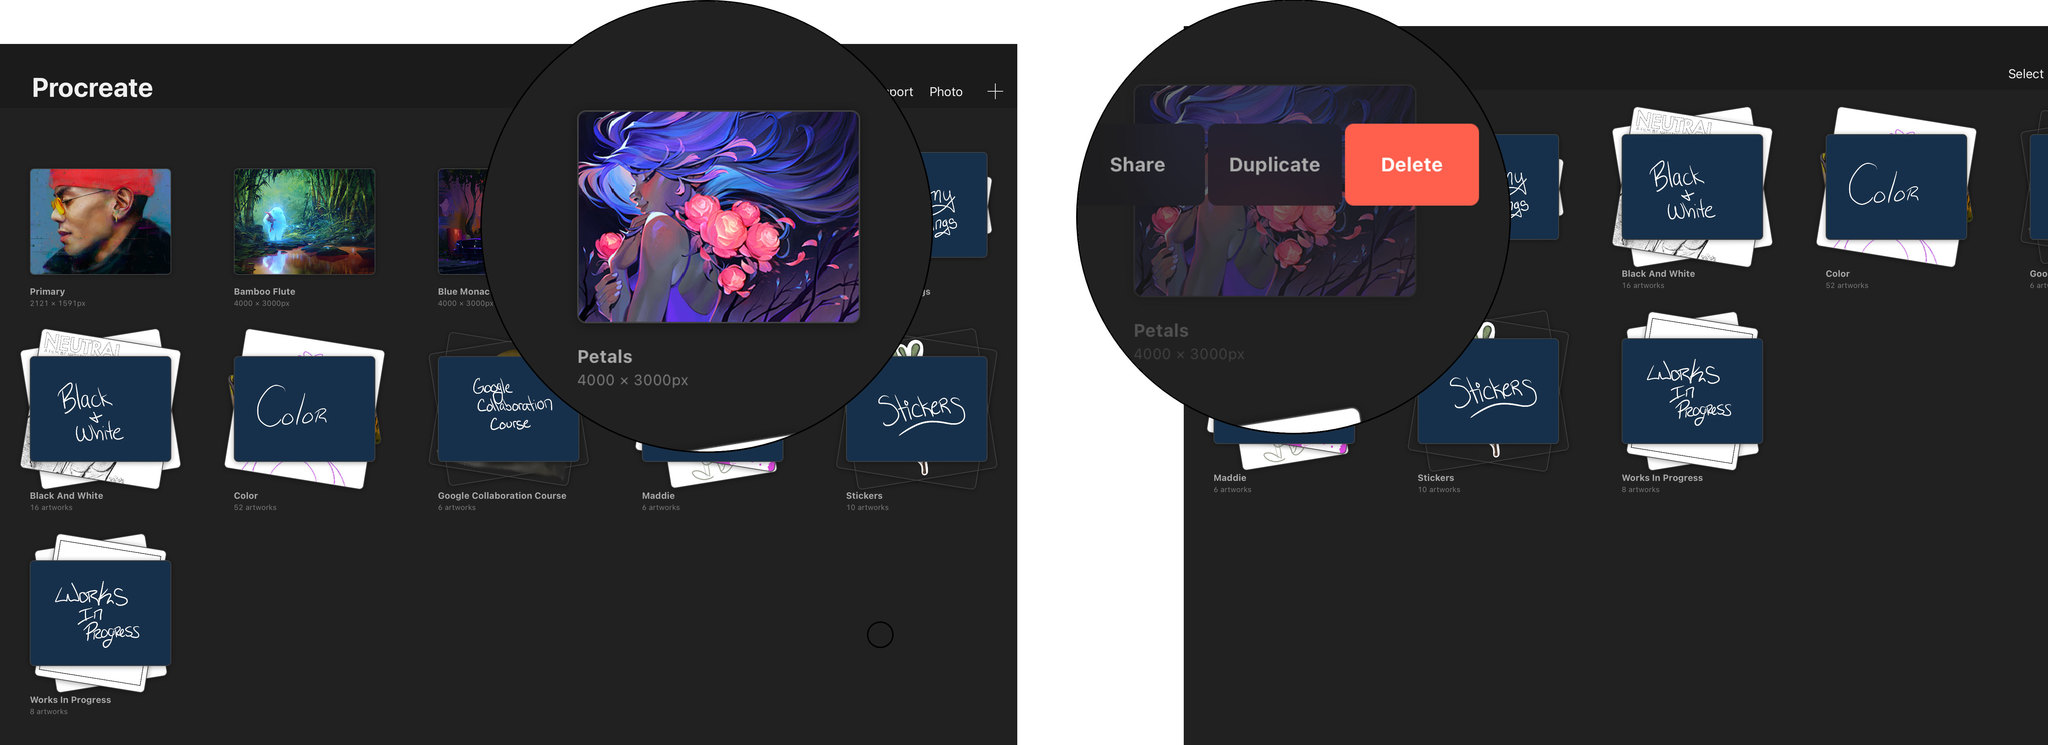
When you start Procreate, you'll be greeted with some sample artwork that was commissioned by Savage Interactive to show off its latest features. You can tap on these samples to open the files or you can choose to delete them.
How to delete artwork
- Swipe on an artwork from right to left.
-
Tap Delete.
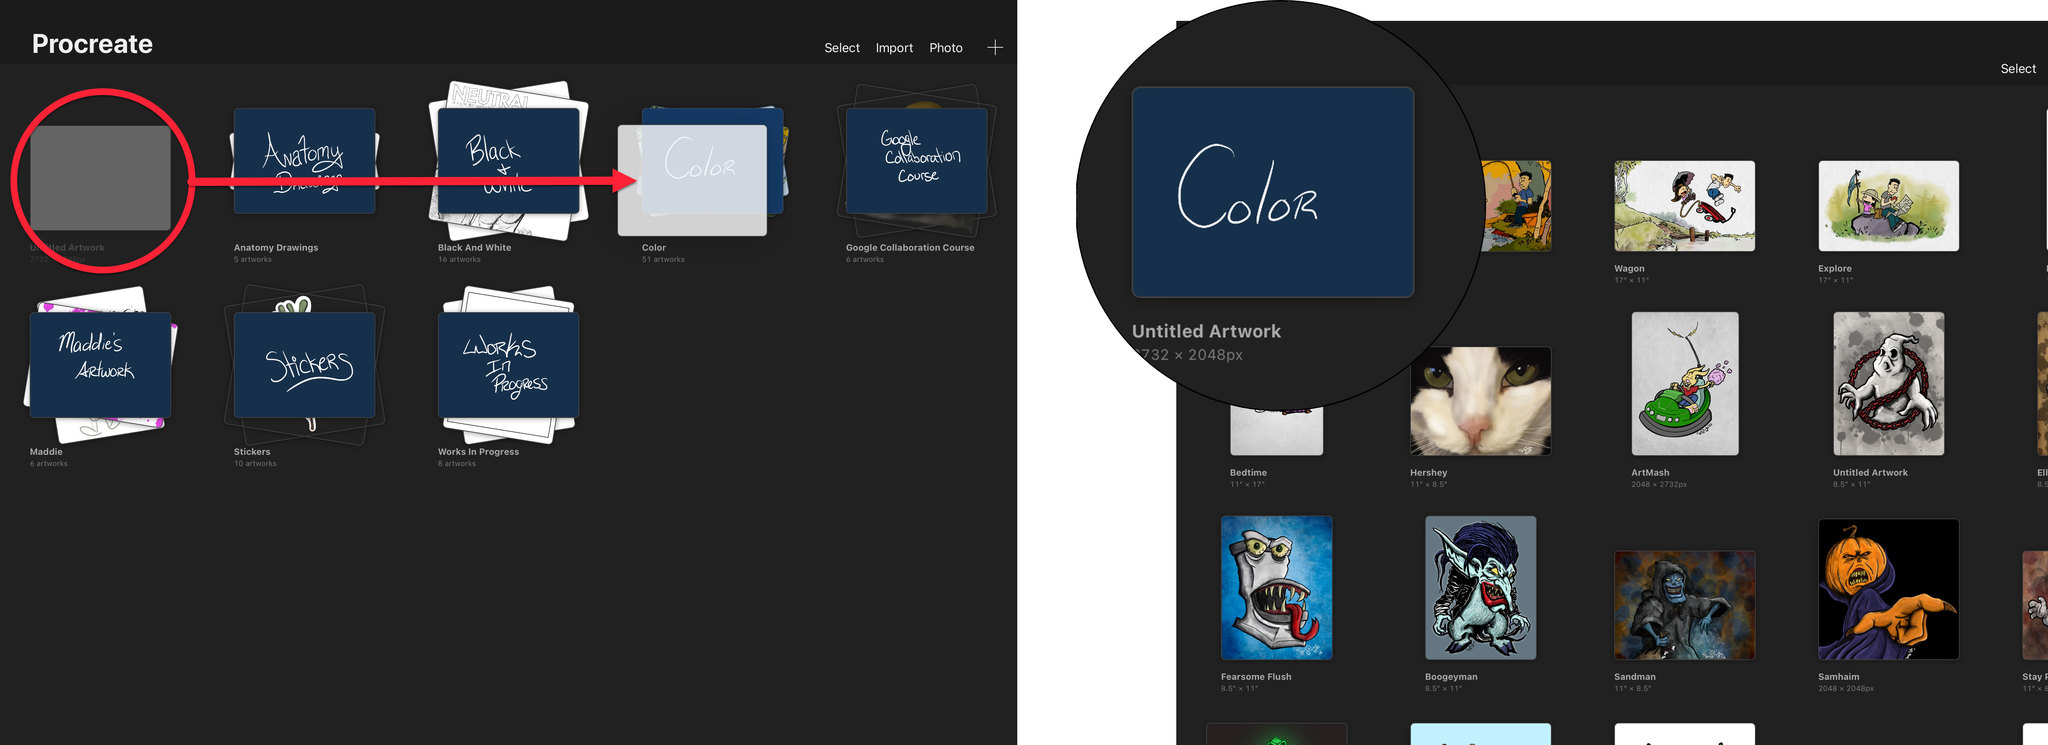
To better organize your artwork, you can create folders, or as they are called in Procreate, a Stack.
How to create a new Stack
- Tap and Hold on an artwork.
- Drag onto another artwork until it flashes.
-
Release and the artwork will now be grouped together in a Stack.
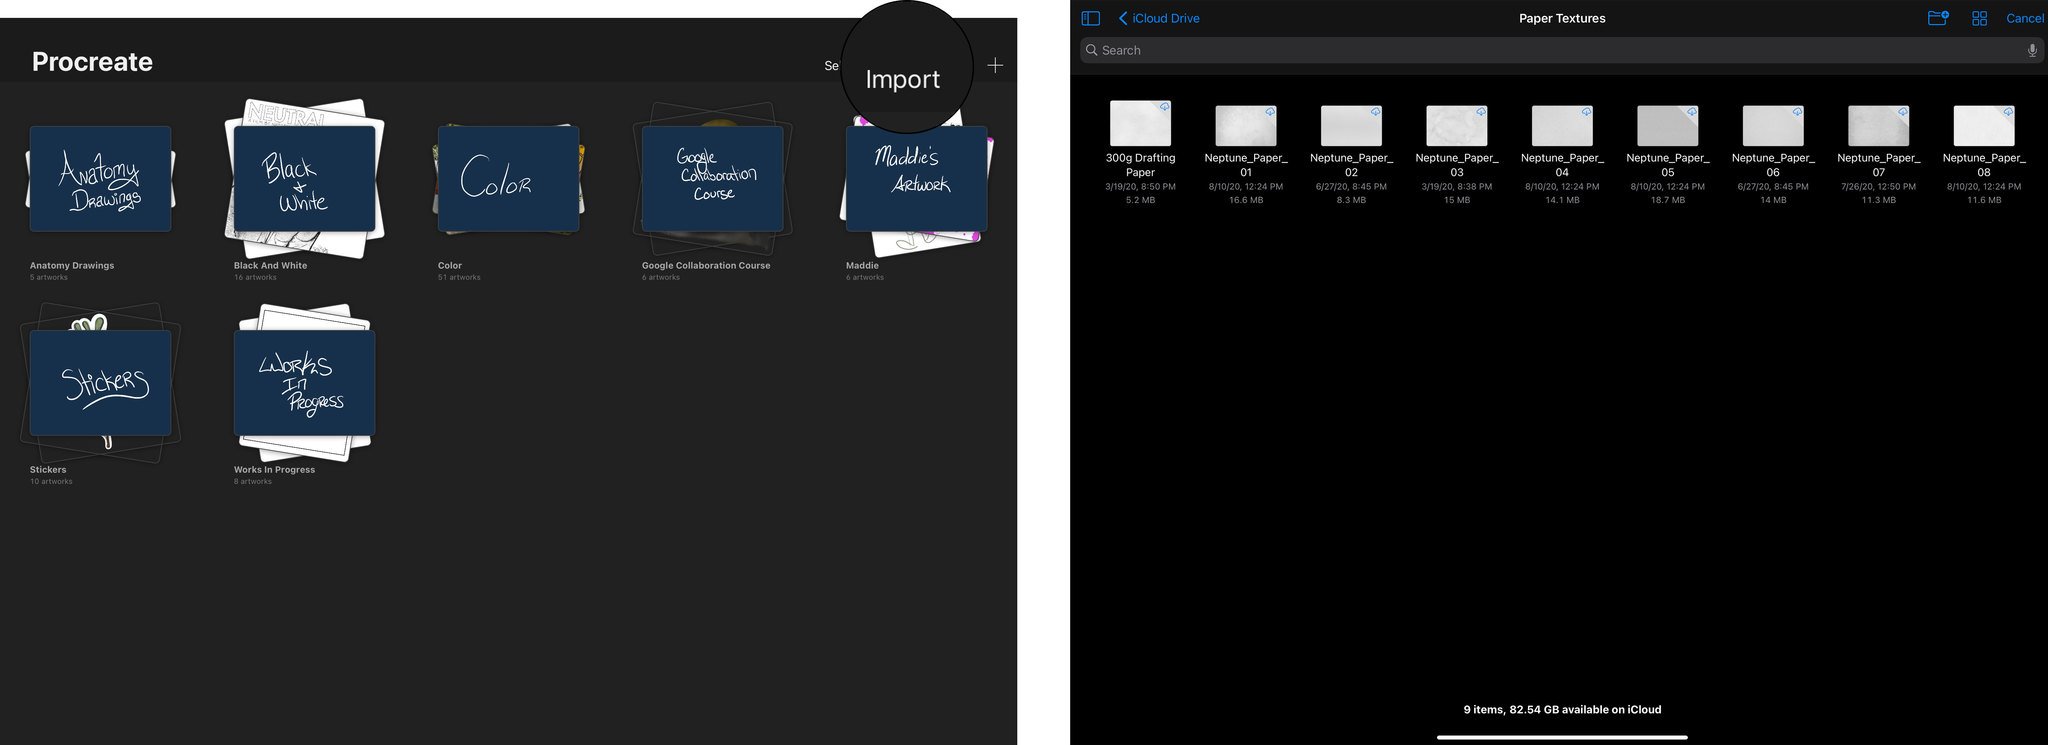
How to import a photo from the Files app
- Tap Import.
-
Select the desired image.
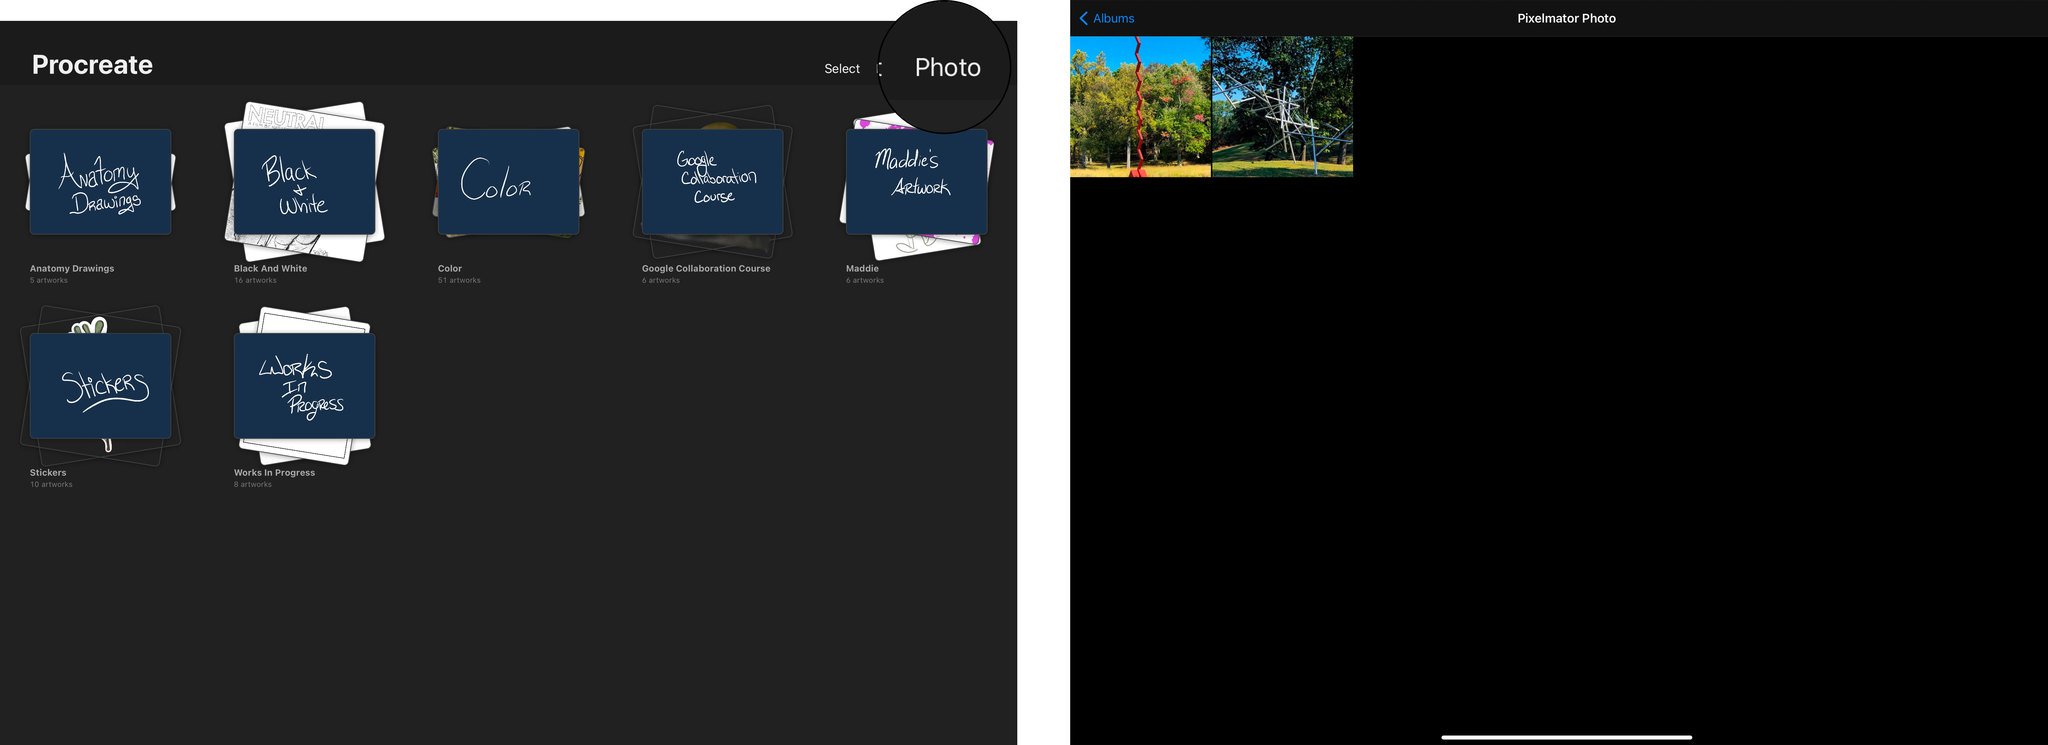
How to start a new project from a Camera Roll photo
- Tap Photo.
-
Select the desired image.
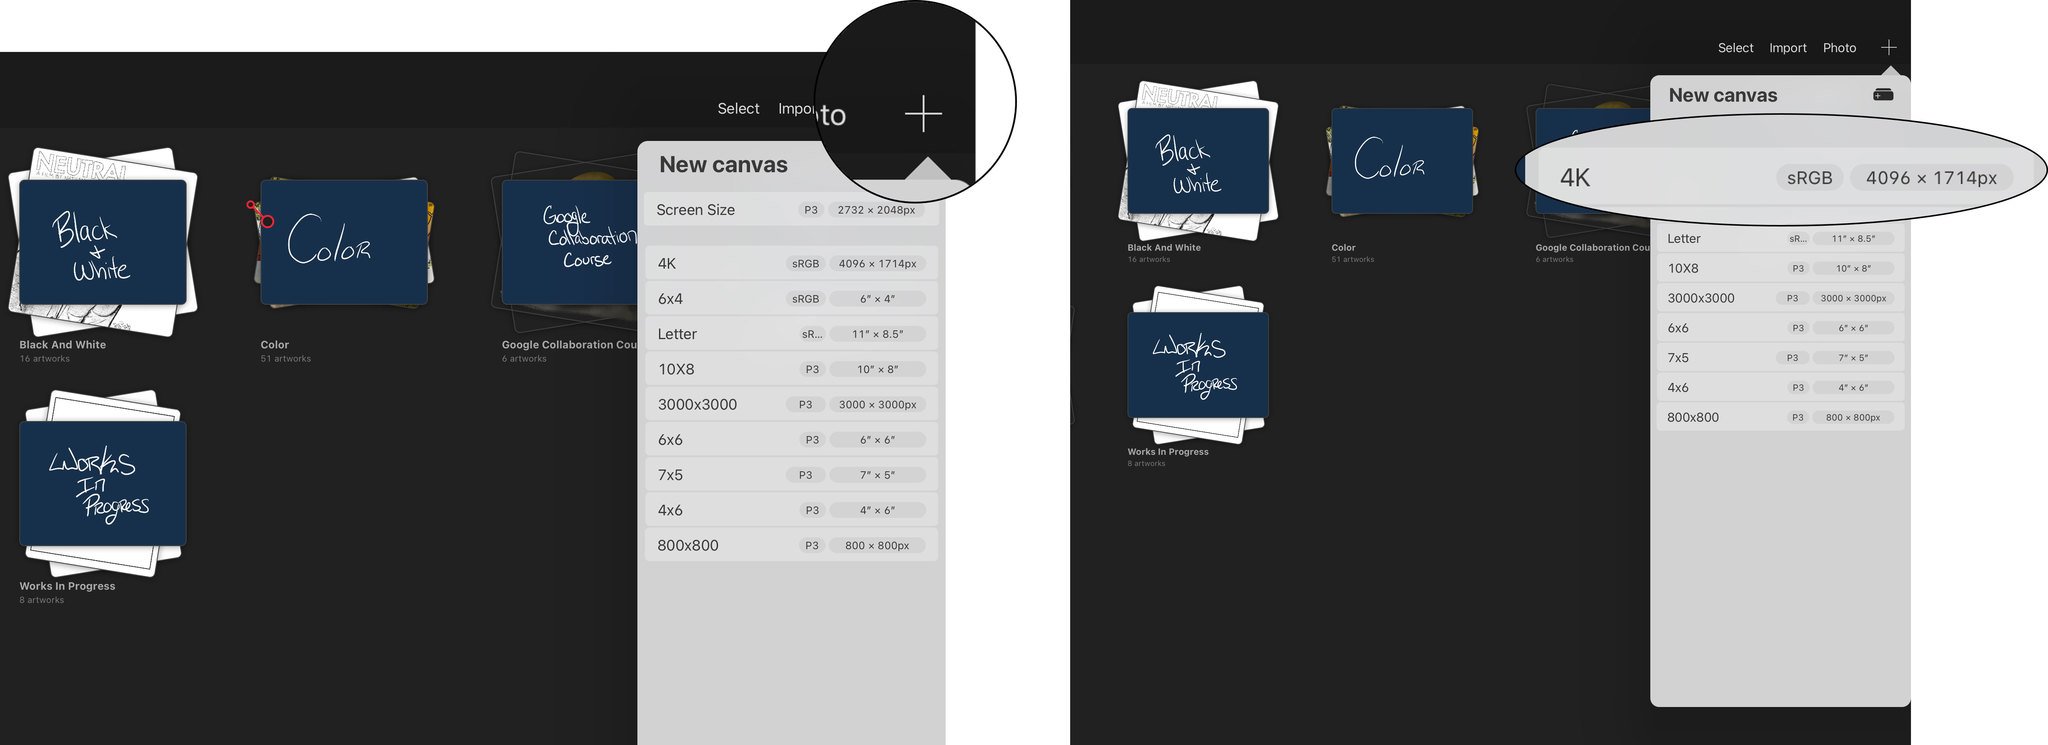
How to begin a New Project Canvas
- Tap the + sign to open the New Canvas pane.
-
Select from a Preset (e.g. Screen Size, 4K, etc.)
How to create a New Custom canvas
- Tap the + sign to open the New Canvas pane.
-
Tap the New Canvas Icon to open the Custom Canvas window.
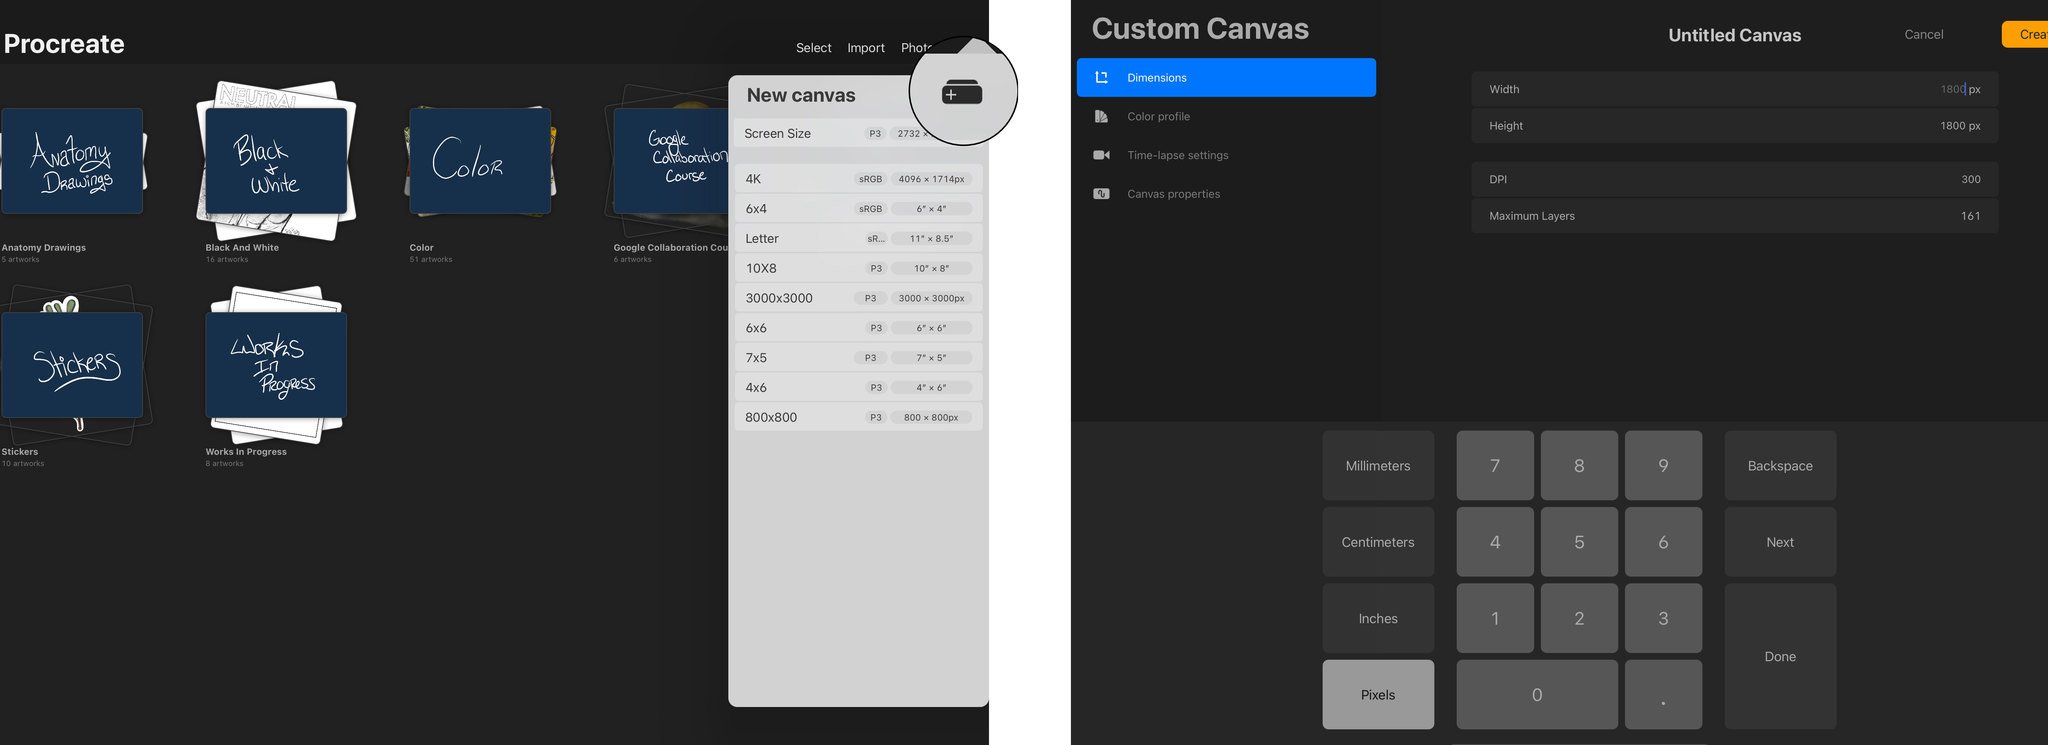
Here you will be able to select the dimensions in millimeters, centimeters, inches, or pixels. The dimensions and your hardware determines the number of layers that you'll have available in your project.
The smaller the dimensions and the more powerful of an iPad you have, the more layers you'll have at your disposal. Unless you're doing a very complex piece, you probably won't need hundreds of layers. However, if you plan on doing larger artwork with a lot of layers, you may want to consider getting an 12.9-inch iPad Pro since it'll give you a larger surface area and better hardware specifications.
While you're creating your custom canvas, you can also change things like the Color Profile and settings to the Time-Lapse Video Recording if you want to use this feature.

Setting the stage
Now that you have your canvas created, let's take a look at all of the menu options available starting in the upper-left.
- Gallery - Takes you back to the Gallery menu screen to choose or start a new artwork.
- Actions - Contains submenus for:
- Add - Insert images and text, and copy/cut/paste commands
- Canvas - Adjustments for the canvas, enabling Animation and Drawing Guides, and importing Reference Photos
- Share - Export artwork as an image or a source file (e.g. Photoshop Document)
- Video - Export a Time-lapse recording of your artistic process for each project
- Preferences - Light/Dark mode, user interface options, pressure sensitivity options, and 3rd-party pressure-sensitive stylus options
- Help - Resources from Procreate to get started
- Adjustments - Contains options for:
- Color and Lighting Adjustments (Hue, Saturation, Brightness, Color Balance, Curves, and Gradient Map)
- Blurring (Gaussian, Motion, and Perspective)
- Special Effects (Noise, Sharpen, Bloom, Glitch, Halftone, Chromatic Aberration, Liquify, and Clone)
- Selection - Allows you to selection portion of your artwork to move and edit using a variety of options
- Move - Allows you to move a selected portion or layer of your artwork
- Brush Library - The digital brushes, pencils, and pens you'll use to create your artwork
- Smudge - Allows you to smudge or blur portions of your drawing
- Eraser - Used to erase any brush strokes on a selected layer
- Layers - The area of canvas on which you draw; Different blend modes are available for each layer in a project
- Colors/Palettes - Where you can select your brush color and import/create your own color palettes
Under the Add menu there are options for inserting files, photos, and text, as well as copying and pasting. Inserting files and images here is pretty much the same thing as creating a canvas from an image in the Gallery menu, but now you can drag and resize the images you've inserted. Inserting text provides you with a lot of options to change the style and formatting, as well as import fonts that you may have downloaded online and saved into the Files app.
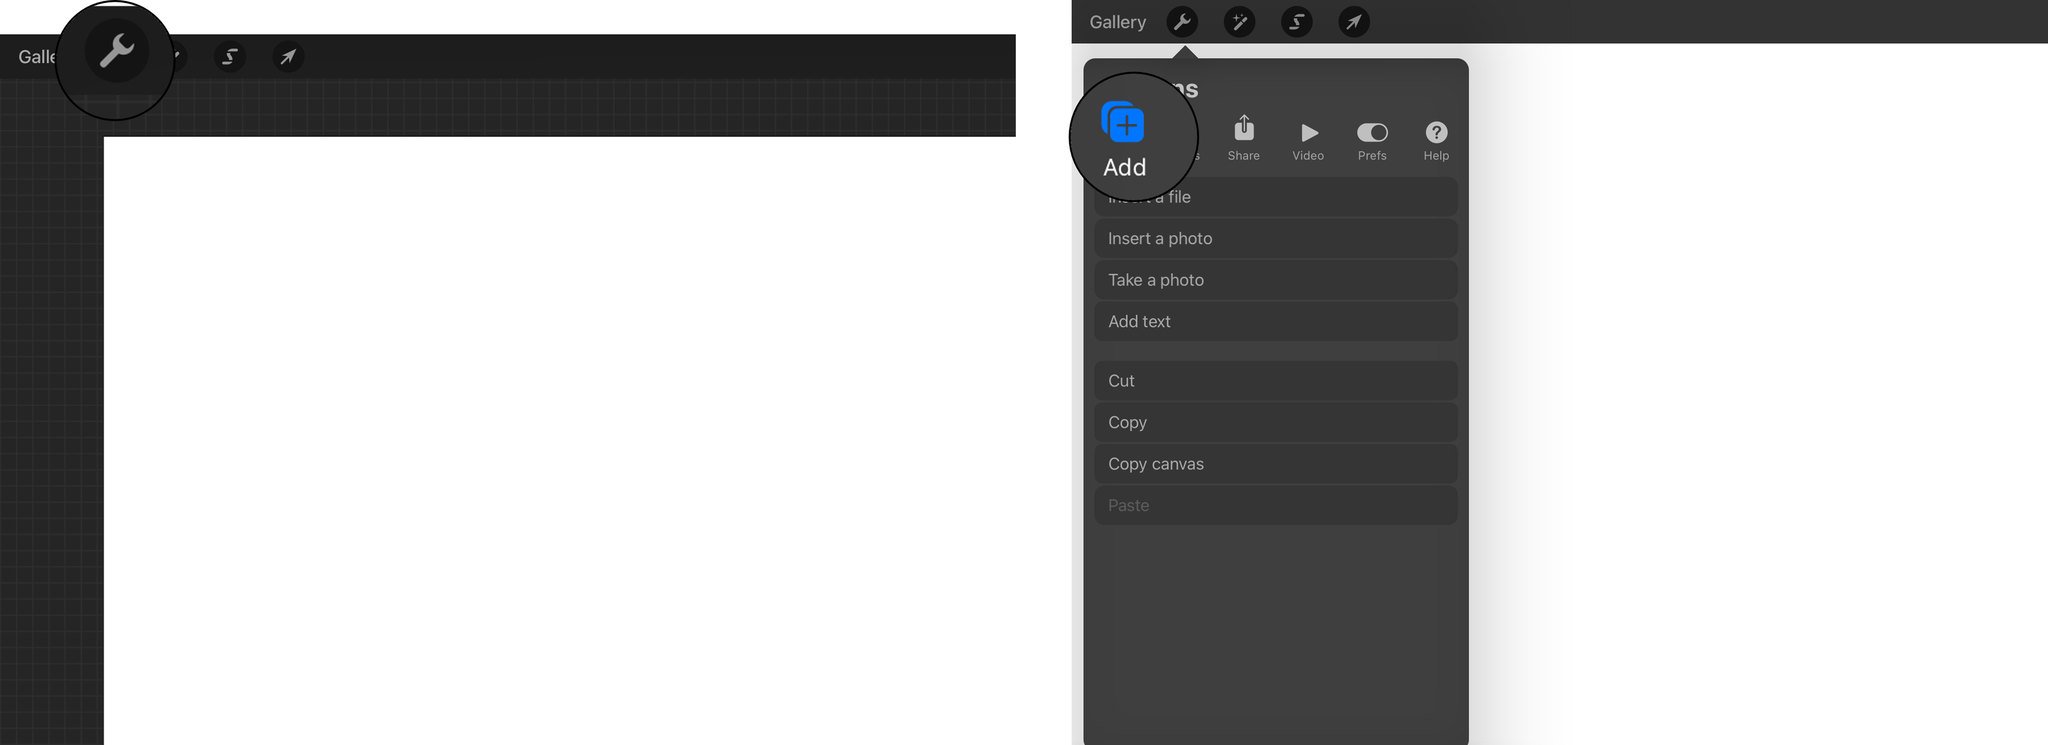
How to insert an image or text
- Tap the Actions wrench icon.
- Tap Add.
-
Choose to insert a File, Photo, or Text.
Adding a Photo or File will allow you to drag and size it onto the canvas accordingly. Adding Text will bring up numerous options to edit the style of the text. You can use the onscreen keyboard or one that is paired to your device to type.
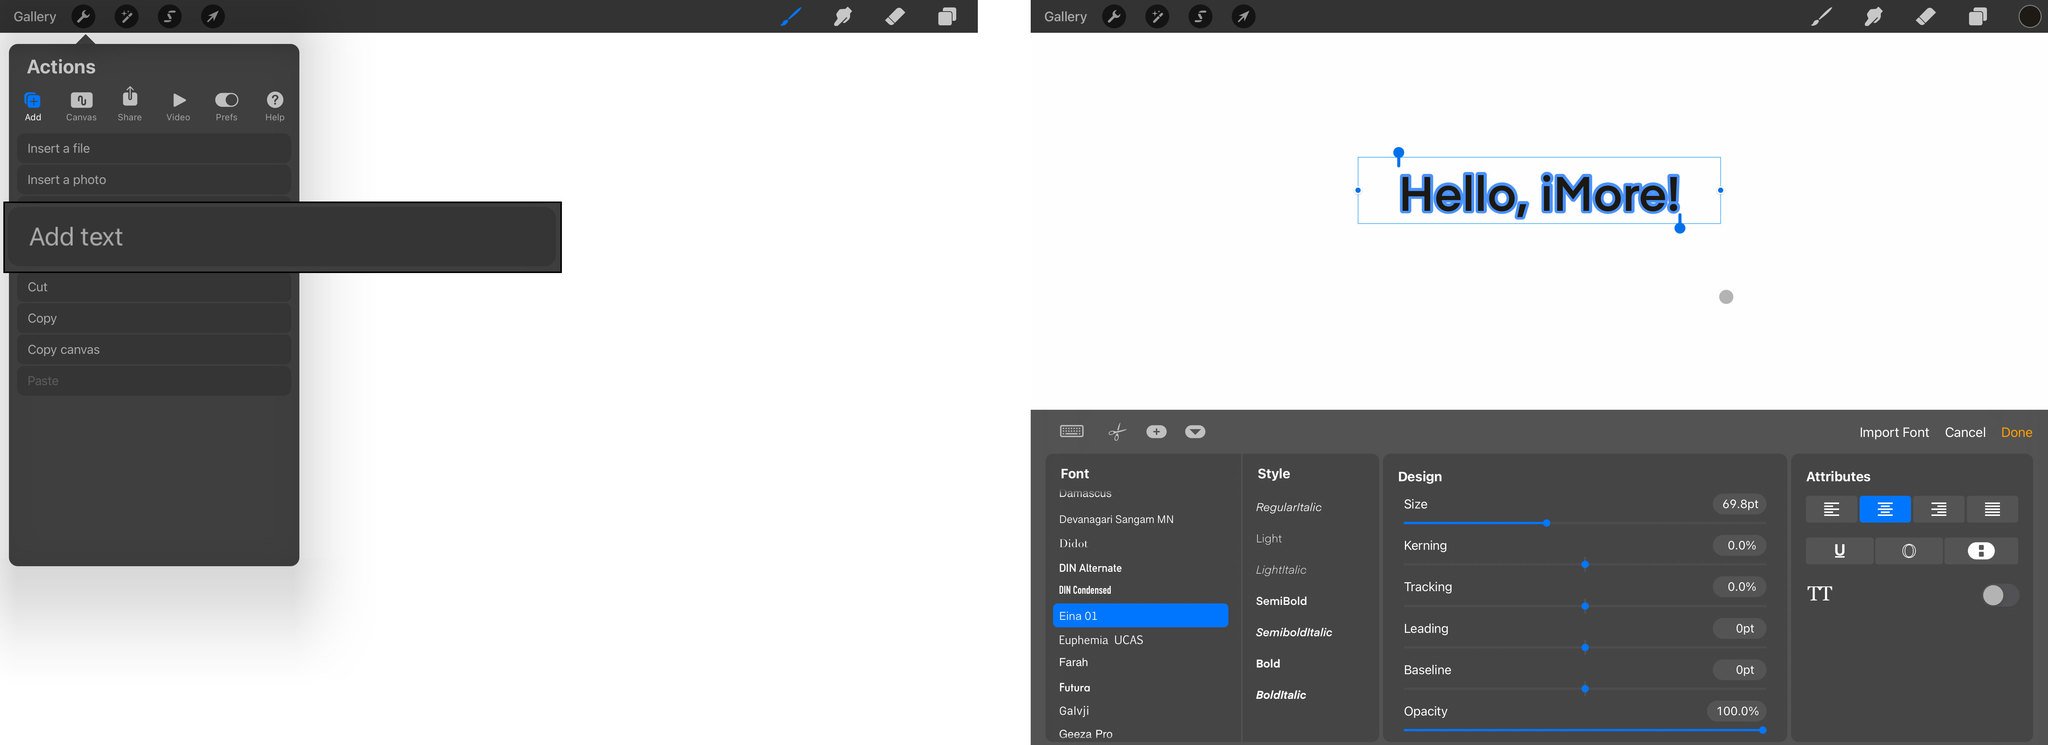
How to insert Text
- Tap Add from the Actions menu.
- Select Add Text.
-
Type your desired text and adjust via the options accordingly.
Under the Canvas submenu, you can change the properties of your canvas if you decide the ones you chose in the beginning aren't what you need.
How to add a Drawing Guide
- Select Canvas under the Actions menu.
-
Toggle on the Drawing Guide.
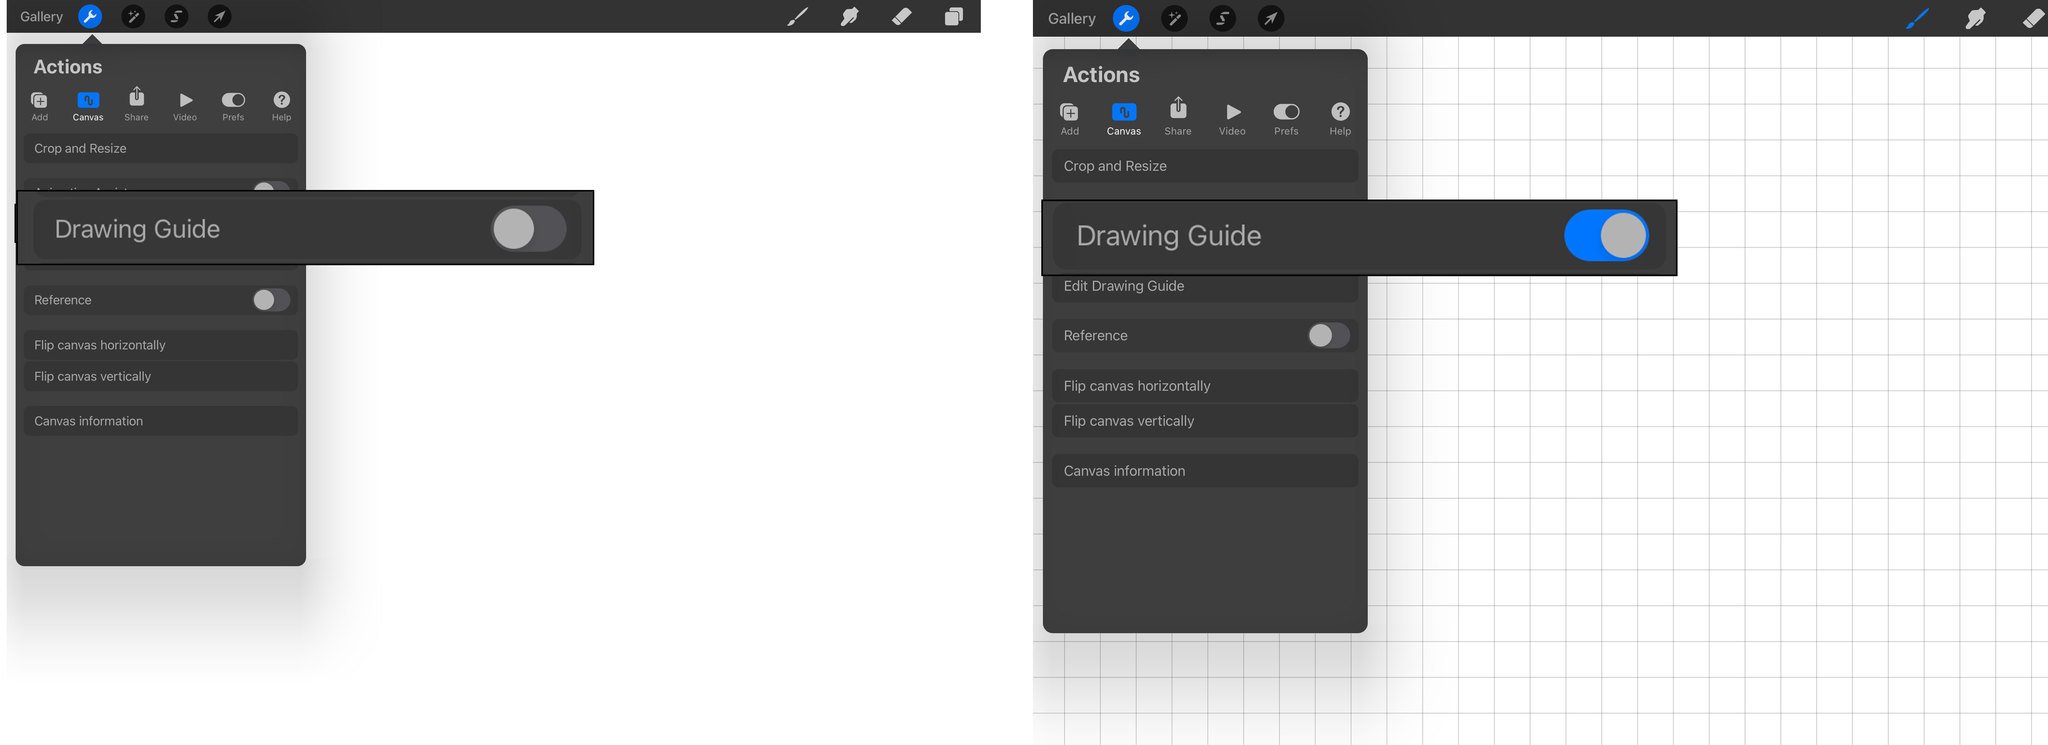
There are four types of drawing guides from which to choose: 2D Grid, Isometric, Perspective, and Symmetry.
How to edit a Drawing Guide
- Tap Edit Drawing Guide under the Canvas submenu.
-
Choose 2D Grid, Isometric, Perspective, or Symmetry.

Note: Toggling on the Assisted Drawing option will make your lines snap to the guide you've just created. This can be useful if you're looking to use the guide as a precise way to draw. This can be enabled and disabled later in the Layers menu.
Animation Assist allows you to create animated images by treating each layer as a new page like in a flip book. This feature can be a lot of fun to use, but it can be pretty in-depth and requires its own tutorial.
How to enable Animation Assist
- Tap Animation Assist under the Canvas submenu.
-
Now each Layer of your project will be its own frame in the animation.

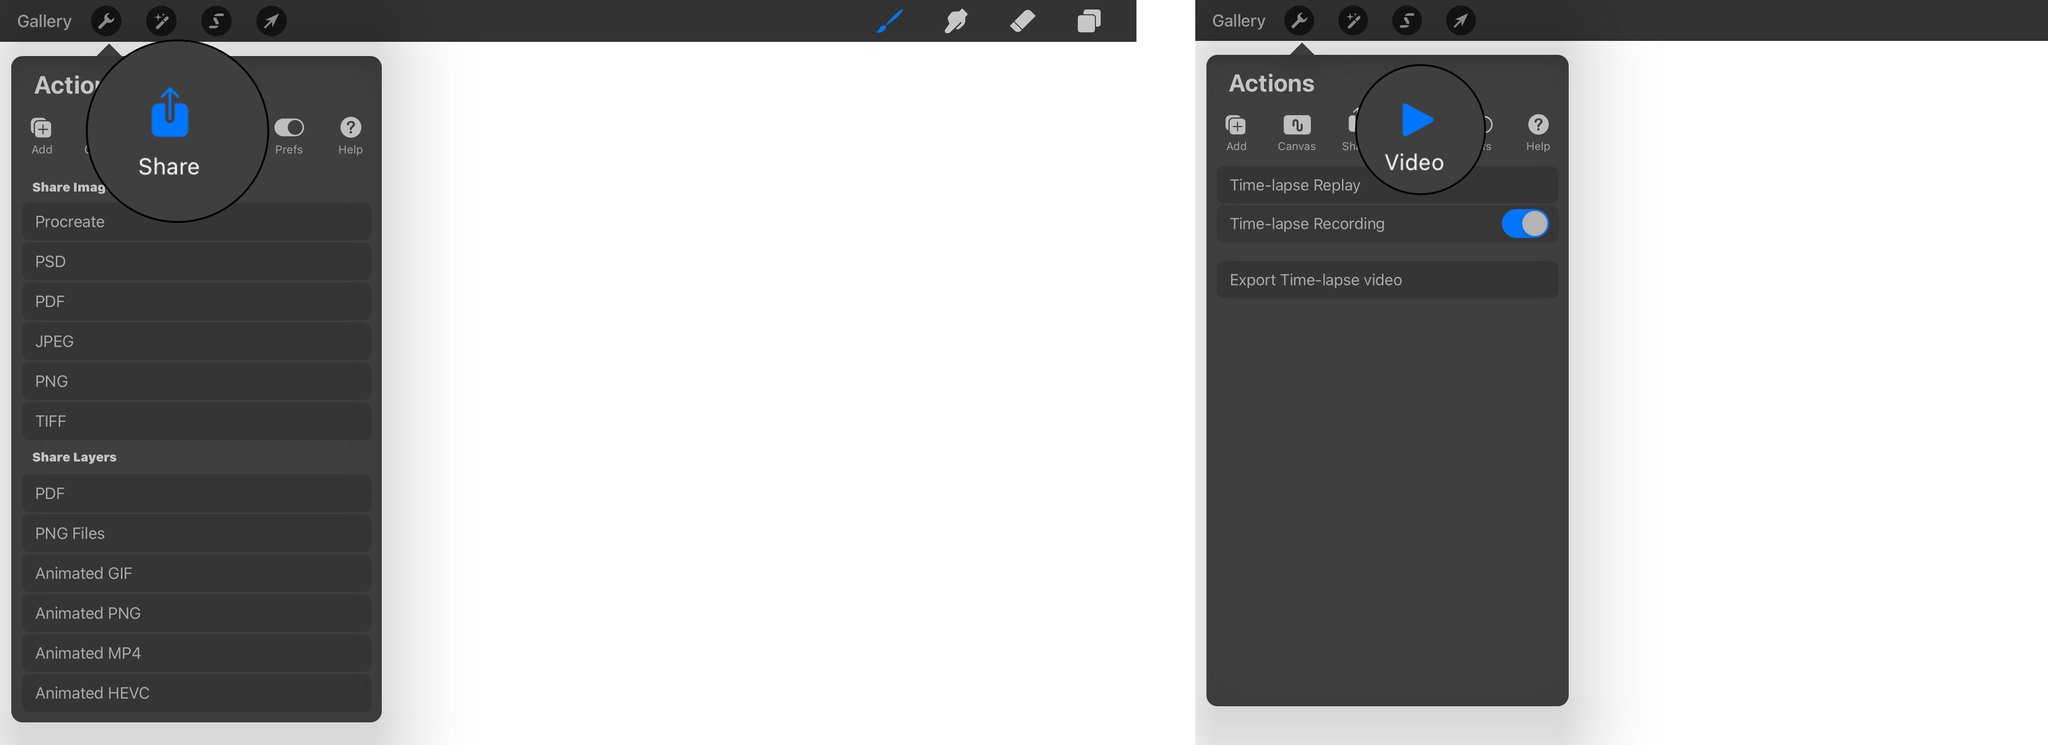
The next submenu under Actions is Share. This is where you'll choose the file type you want to export and where to save the image. Procreate is capable of exporting .psd files, which allows you to import your layers and assets into other apps such as Adobe Photoshop/Illustrator/Fresco, Affinity Designer/Photo, or Pixelmator/Pixelmator Photo for further editing.
The Video tab is where you can choose to preview, disable, or export the time-lapse recording of everything you've done in that project.
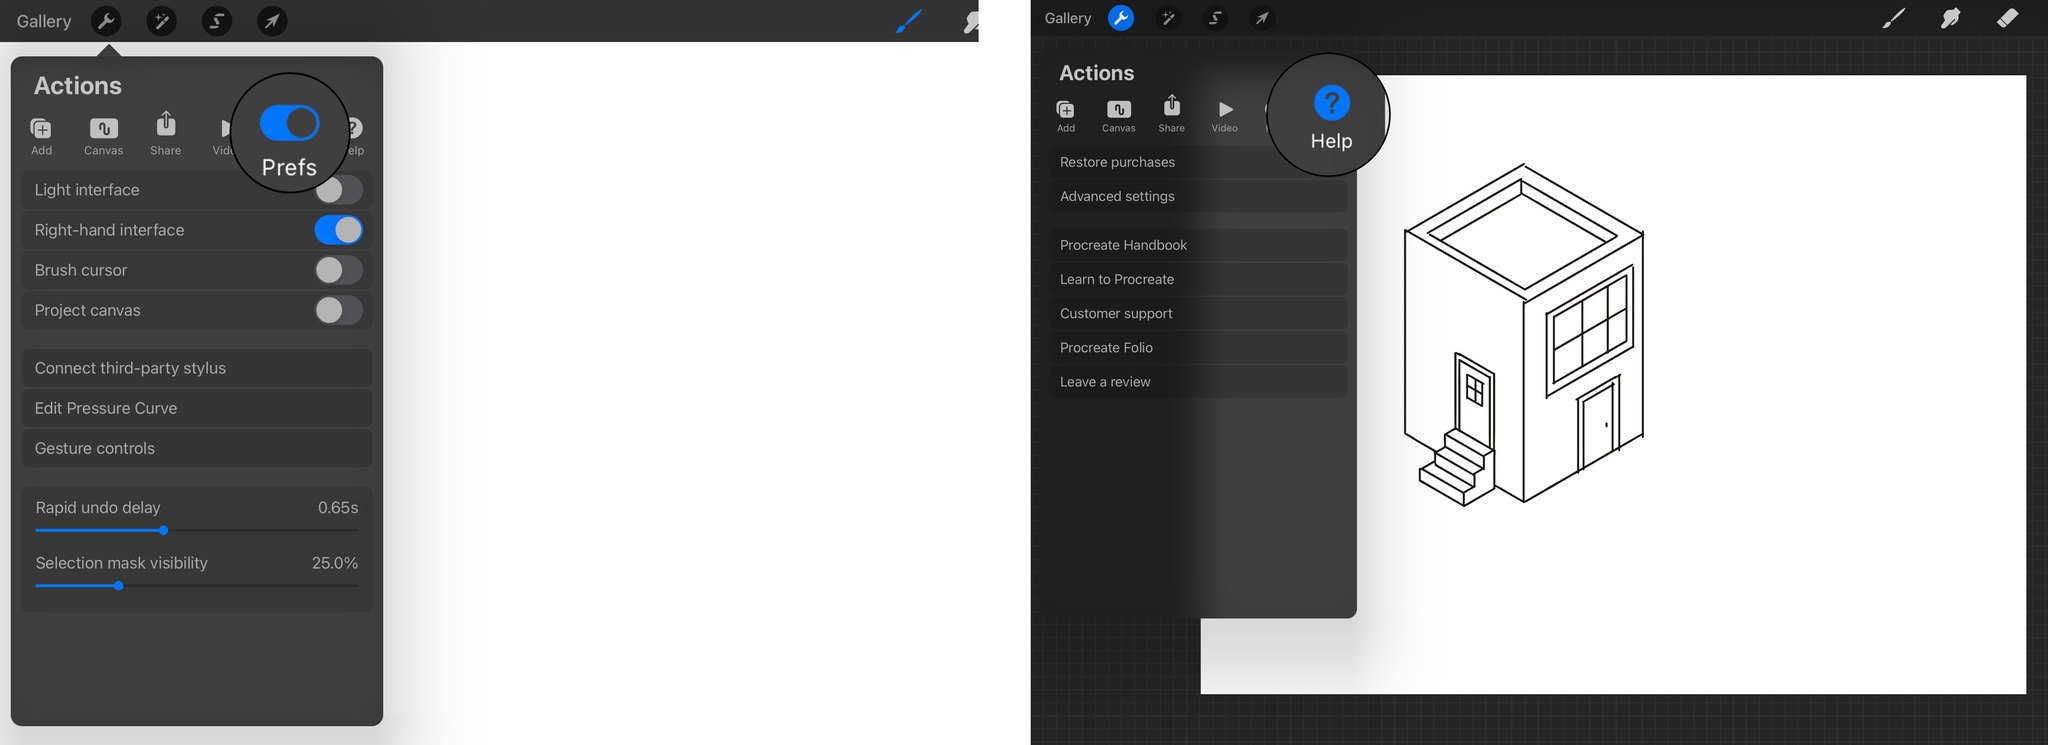
In the Preferences tab, you can choose a light or dark theme, which side you want the user interface controls, connect a 3rd party stylus (ones that are pressure sensitive that aren't an Apple Pencil), and other program settings.
Finally, under the Help tab, is a list of resources provided by Procreate as well as shortcuts to the iOS Settings app to fine-tune advanced settings.
Adjusting your art
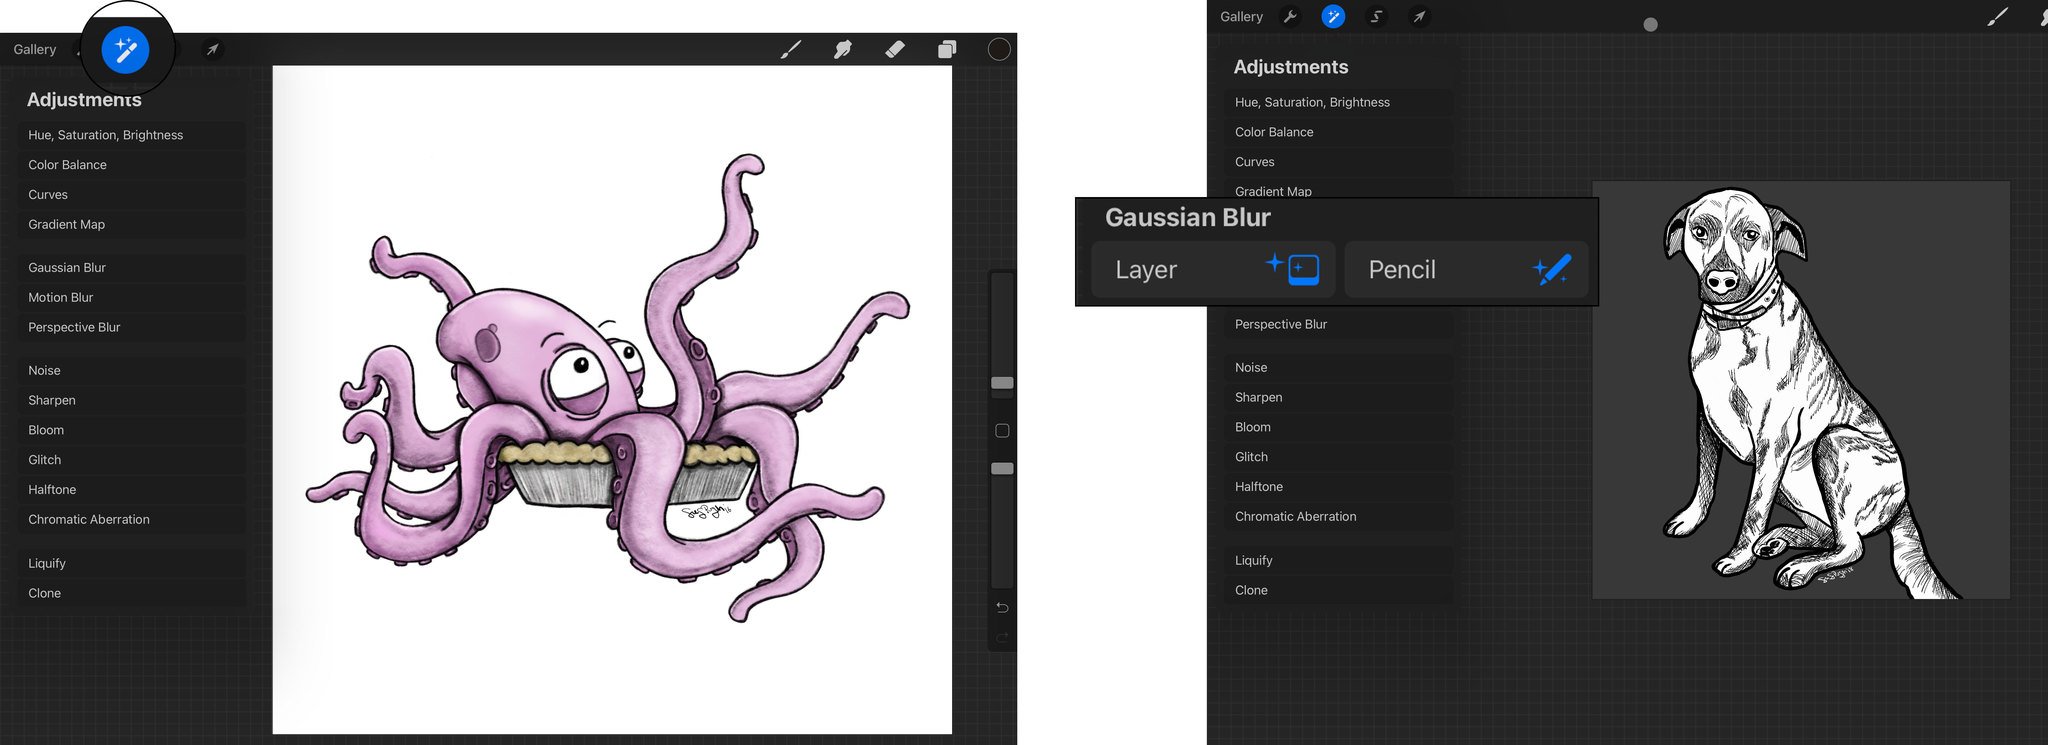
The next panel from the left is Adjustments. Here's where you can tweak basic things like the hue and contrast, but also add advanced effects like blurring, noise, Glitch, Chromatic Aberration, and the like. Some of these effects are straightforward, but others are more complex and will need to be covered in an advanced tutorial.
How to add an Image Adjustment
- Tap on the Adjustments icon.
- Select any of the Adjustment options.
-
For Hue, Saturation, Brightness through Chromatic Aberration, you can choose to apply it to the entire Layer or use an Apple Pencil and precisely draw where you want to adjust.
Liquify and Clone are adjustments that can only be adjusted using your finger or stylus. Liquify allows you to distort your image using a variety of options and Clone will duplicate an area of your drawing that you choose (it's similar to the Rubber Stamp tool in Adobe Photoshop).

After the Adjustments panel is the Selection panel. This is the area you'll use to select specific portions of your illustration to scale, copy, fill with color, etc. There are four options for selecting portions of your art: Automatic, Freehand, Rectangle, and Eclipse. If you're familiar with Adobe Photoshop, think of the Automatic option as the Magic Wand tool, Procreate will make a selection based on the area you tap on. Freehand allows you to draw a dashed line selection and gives the most control, and Rectangle and Eclipse select by creating their corresponding shapes.
How to make a Selection
- Tap the Selection tool icon.
- Choose from Automatic, Freehand, Rectangle, or Eclipse.
-
If using Automatic, simply tap the part of the artwork you want to select. For the other options, draw where you want to select.

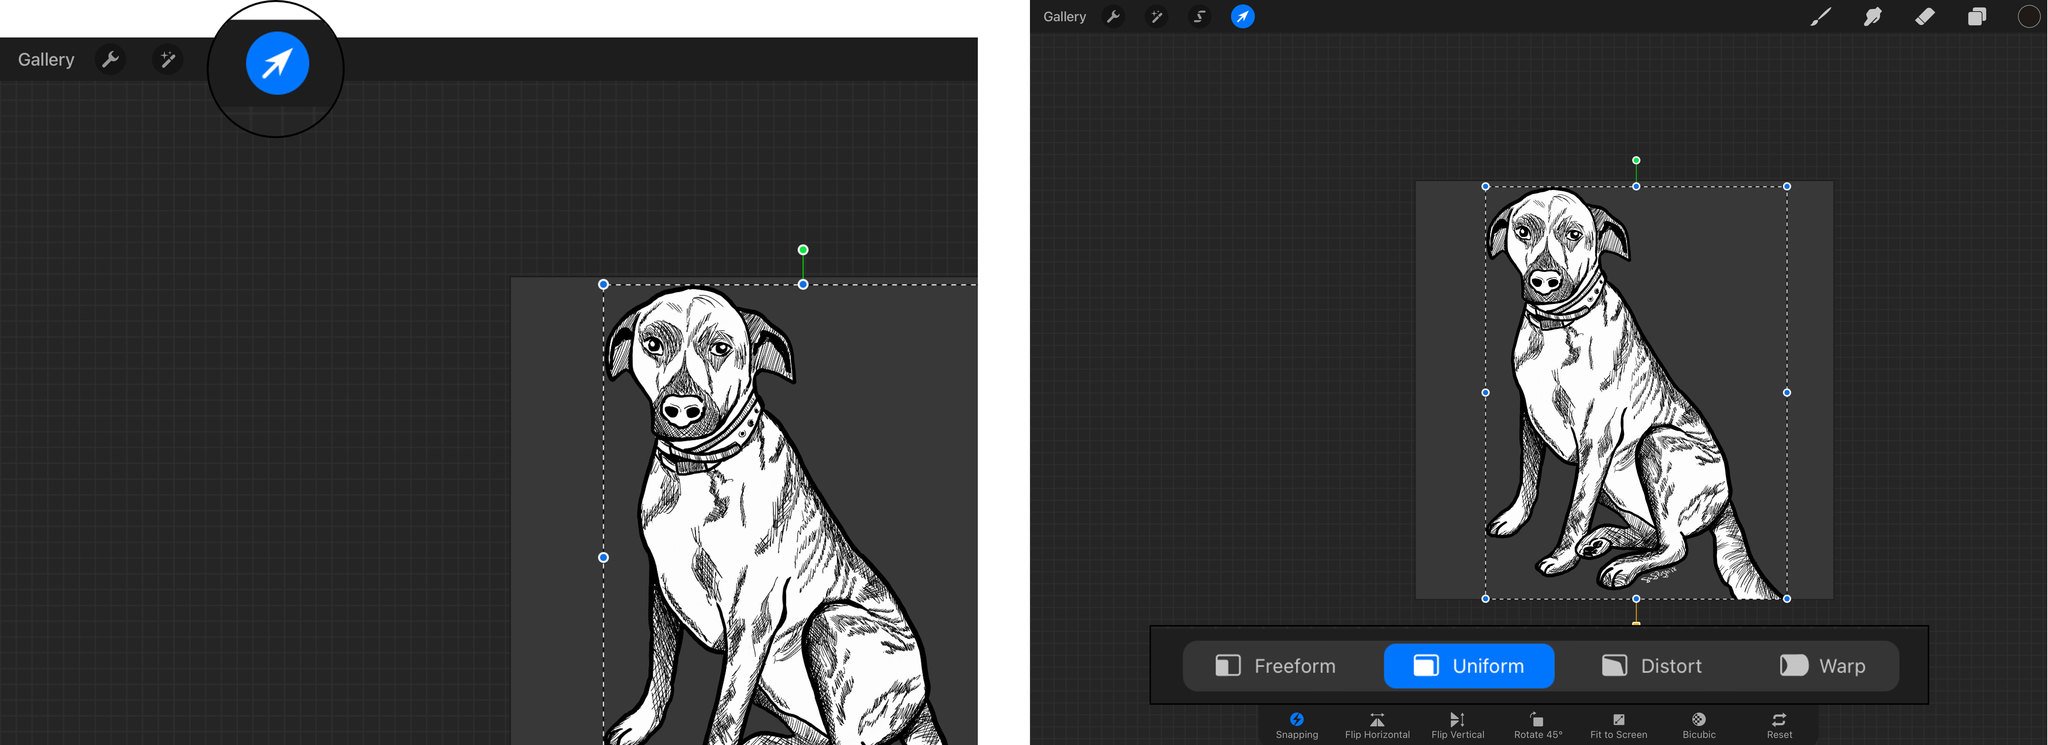
Once you have your Selection made, you can use the Move tool to move, resize, distort, warp, and rotate it.
How to Move your selection
- Select the Move tool.
-
Choose from the options how you wish to resize or edit the selection.
Customize all the things
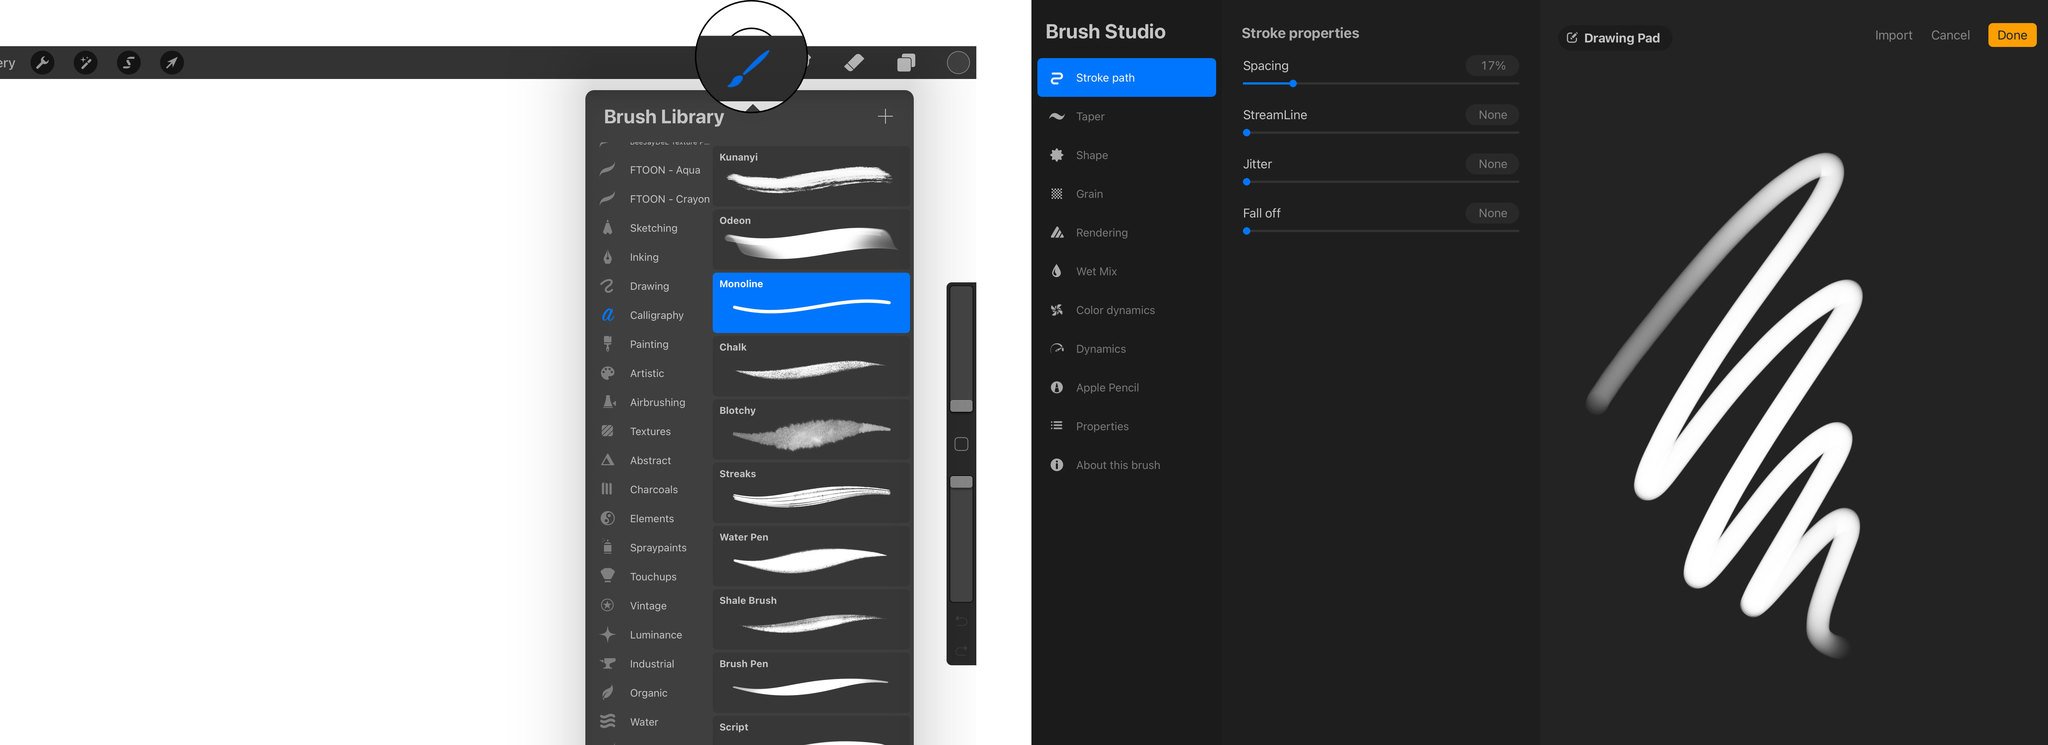
The next menu on the top toolbar, and proply the most important, is the Brush Library. It is here where you'll choose your digital drawing tool of choice. You can choose from a wide-variety of the stock brushes, you can import new ones from third-parties, and you can even create your own brushes.
How to select or edit a Brush
- Tap on the Brush icon to open the Brush Library.
- Select a Brush from one of the Categories.
-
Tap on the Brush to open the Brush Studio to edit the options.
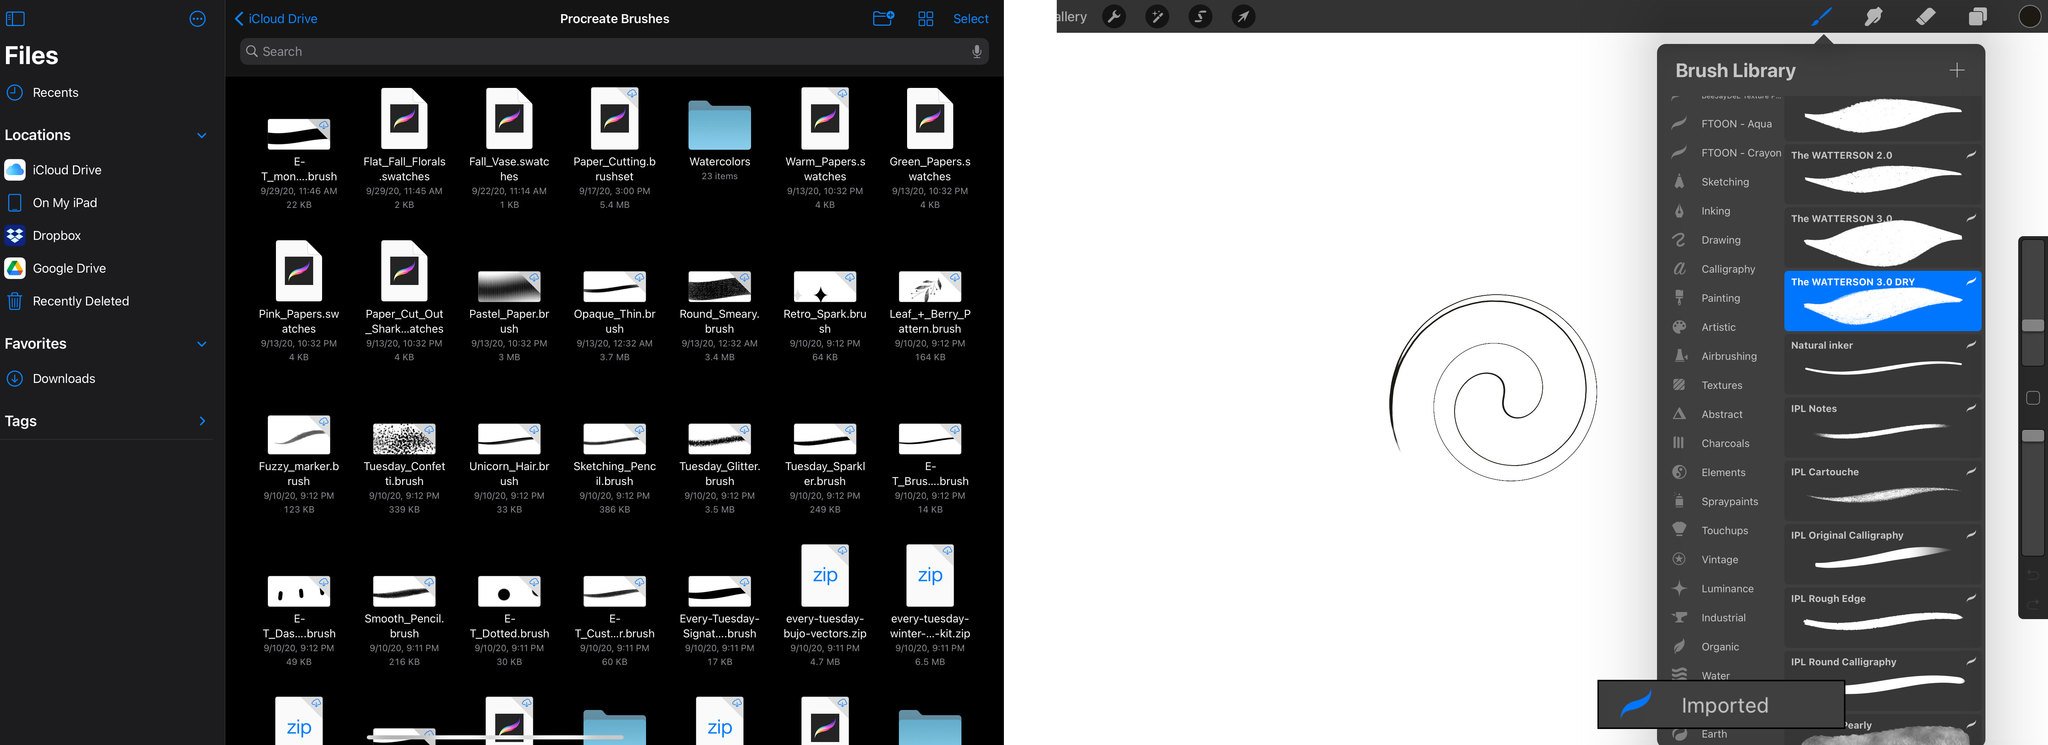
You can also choose to import brushes from 3rd-parties. There are a ton of options that are both free and paid that can be found by doing a web search for "Procreate Brushes." Once you have them downloaded and saved onto your iPad, you can import them into Procreate and begin using them immediately.
How to import new brushes into Procreate
- Open the Files app and locate where you saved the downloaded .brush files.
- Tap on the file you want to import, it will send it to Procreate automatically.
-
Open the Brush Library and select your new brush. If you cannot find it, it may be in a new category folder called "Imported."
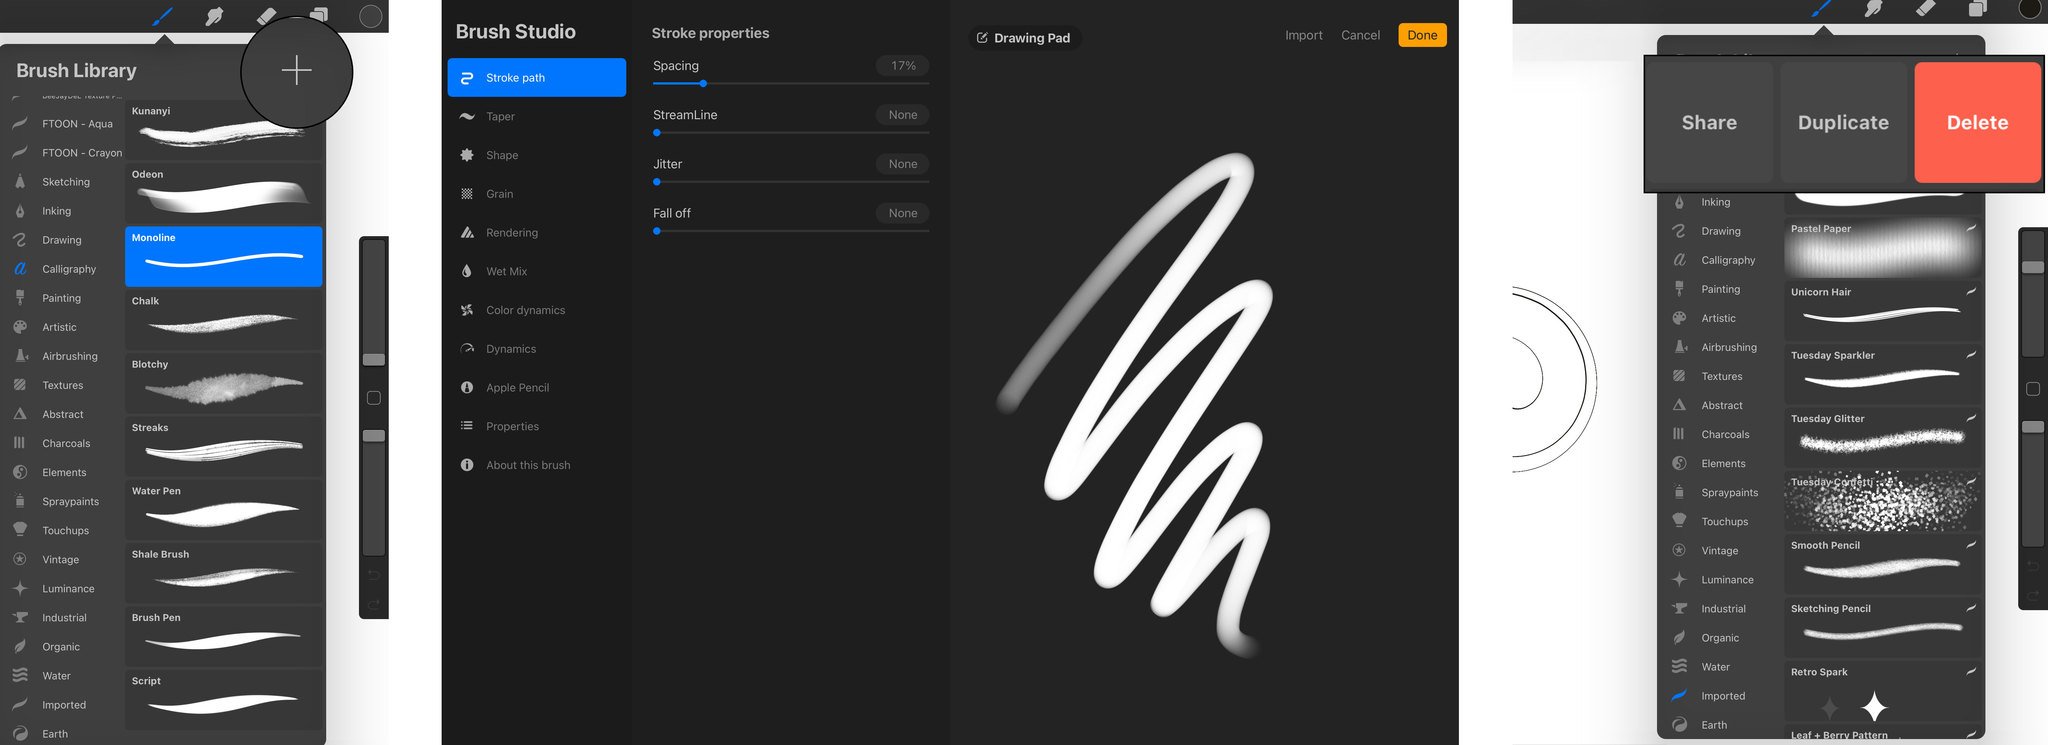
You can also create your own brush from scratch, which gives you endless possibilities. This can be very complicated depending how detailed you want your brush settings to be.
How to create or delete your own custom brushes
- Tap the + in the Brush Library.
- Adjust settings as needed in the Brush Studio and tap Done.
-
To Delete, Duplicate, or Share, swipe from right to left on the Brush.
The next two tools are Smudge and the Eraser, which are pretty self-explanatory. The Smudge tool allows you to smear and blend portions of your artwork and the Eraser will...you guessed it, erase.

After the Eraser tool is the Layers panel. This is where you can not only add an additional layer on which to draw (tap on the + sign to add more), but you can also change the Blend Mode and settings for each layer individually. There are a lot of settings available for Layers and an advanced tutorial would be needed to cover all of them in-depth, but here is how to access them.
How to change the Layer settings
- Tap the Layers icon.
- Tap the rectangular Layer Thumbnail to bring up additional options (e.g. Rename, Select, Copy, Fill Layer, Clear, Alpha Lock, Mask, Invert, Reference).
-
Tap N to view Blend Mode options and change Opacity.

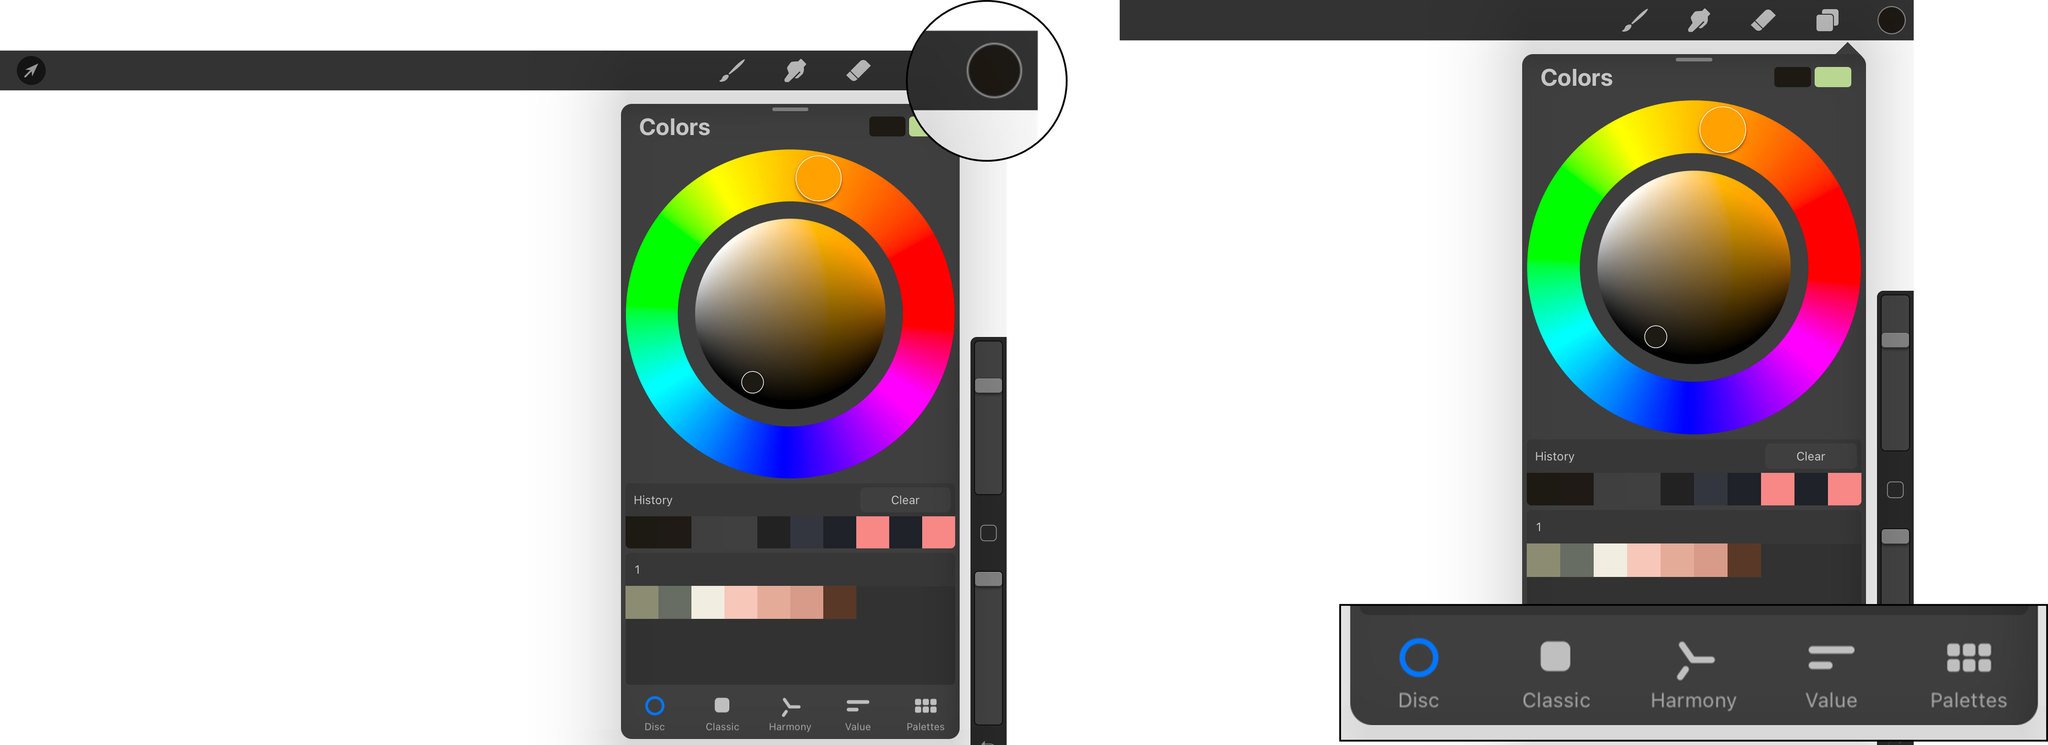
Finally, the circular colored icon in the upper-right of the interface is the Colors panel. This is where you can not only choose your colors via a Color Disc, Classic color picker, Harmony, or** Value sliders**, but also create and import Color Palettes.
How to change Colors
- Tap the Colors Circle.
-
Select between Disc, Classic, Harmony, or Value and choose a color for your Brush.
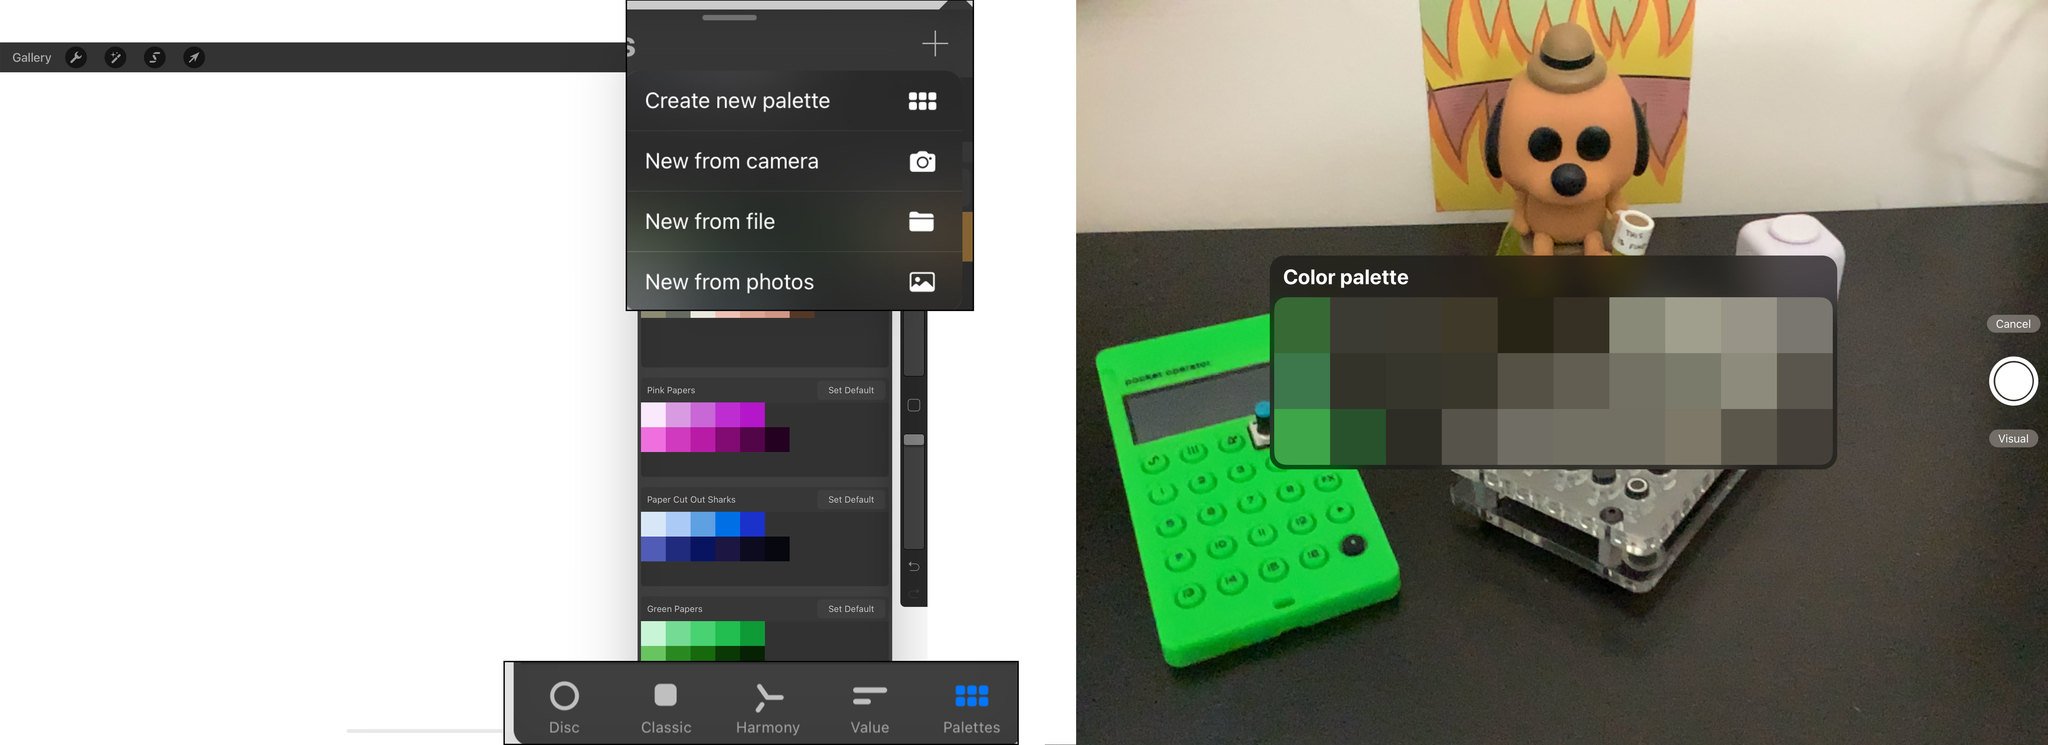
Stock color Palettes are available in Procreate, but like Brushes, you can import them from 3rd-parties in the form of .swatch files. However, you can also easily create your own using your camera, a photo from your camera roll, or your Files app. Using your camera will bring up a 30-swatch overlay to create a Color Palette in real-time that you can save. Using a photo will grab 30 colors from the image.
How to create a new Palette
- Choose Palettes from the bottom of the Colors Menu.
- Tap the + sign.
-
Choose to create a new palette from scratch, using a photo/file, or your device's camera.
Questions on Procreate?
I hope this gives you a good place to start using Procreate. There are tons of advanced features and settings that are too in-depth for a getting started overview, but if you're interested in more advanced tutorials, let us know!
Procreate is a powerful art app for iPad — here's how to get started! posted first on http://bestpricesmartphones.blogspot.com
No comments:
Post a Comment